Insights on Embryo Transfer Procedure
Embryo Transfer is a simple yet critical element in the final step of In Vitro Fertilisation. The transfer technique itself is recognized as an important determinant of IVF success.
Embryo Transfer, if done in the same cycle as egg pick up and IVF, it is called Fresh Embryo Transfer as the embryos are just formed.
If it is done in another cycle with the frozen embryos, it is called Frozen Embryo Transfer. (FET)Both are good as the results differ from patient to patient. But generally, FET has a better success rate as the body is in the normal state without any ovarian stimulation.
So let’s go through the procedure
Book an Appointment with Dr. Arockia for fertility concerns
Let’s go step by step
1. It is a sterile procedure, so done in the operating room.
2. Patients mostly would have undergone mock or dummy ET prior to starting IVF treatment.
3. Anaesthesia is not necessary, only in case the patient is anxious or have a history of difficult ET, it is needed.
4. Light breakfast can be taken, fasting if anaesthesia has to be given.
5. On the day of Embryo Transfer, the doctor informs about the fertilisation rate, quality of embryos and counsels regarding the number of embryos to be transferred and extra embryos for cryopreservation.
6. No of embryos to be transferred is decided depending on the patient’s age, a number of good quality embryos available, previous IVF results and also the patient’s preference.
7. The embryologist also participates in decision making.
8. A full bladder is desirable during to visualise the uterus transabdominally.
9. Before starting the procedure, an ID check is done by the clinician and embryologist.
10. Review of the patient file is done for Ultrasound picture of the uterus and comments on the mock embryo transfer is checked.
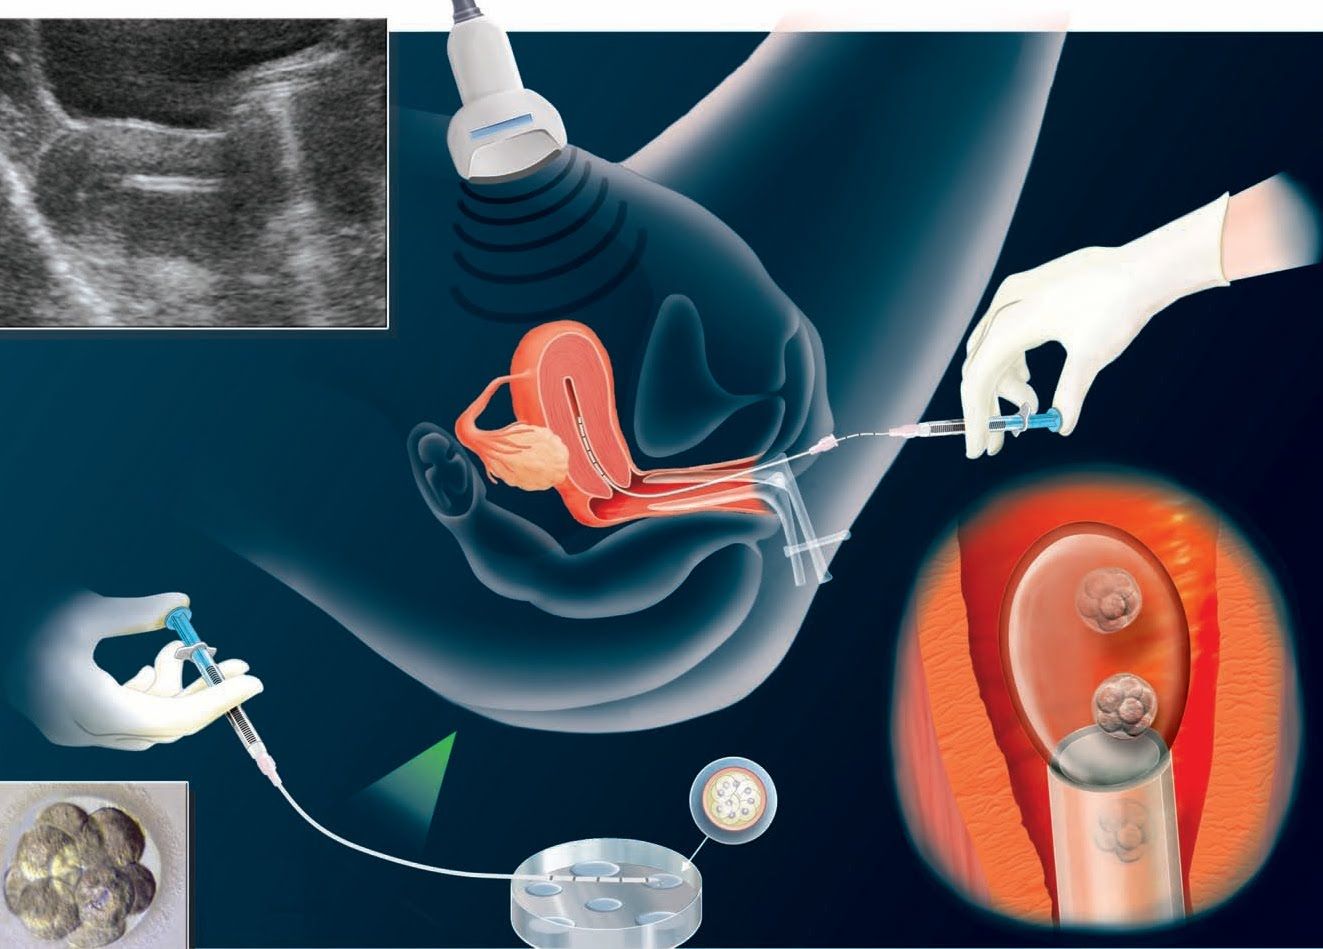
11. The patient lies down on the OT table, and the legs are folded at the knees and supported by stirrups.
12. Once the patient is in position and the embryologist is ready, the transabdominal scan is done to visualise uterus, cervix and endometrial lining.
13. Private parts are cleaned and legs covered with OT cloth.
14. Cervix or the uterus mouth is visualised with Cusco’s bivalve speculum
15. Cervix is wiped with gauze dipped in saline and culture media.
16. Vaginal antiseptics are not recommended at ET(potential toxicity to the embryos)
17. The embryo transfer is usually done by afterload technique where the outer catheter is inserted first into the uterus, and the inner catheter is loaded with embryos and inserted into the outer catheter.
18. Clinician initially passes the outer sheath through the cervix till internal os under Ultrasound guidance.
19. Then the embryologist loads the inner catheter with embryos and hands it to the clinician.
20. The inner catheter with embryos is threaded into outer sheath through the distal end and advanced through sheath to correct placement 1-2 cm below the fundus of the uterus under USG guidance.
21. Embryos are ejected slowly. After 10 seconds the catheters are removed gently and handed to the embryologist who checks for any retained embryos.
22. Any retained embryos should be reloaded for transfer.
23. Effect of retained embryos in the transfer catheter on the pregnancy outcome is minimal.
24. If the difficulty is encountered during catheter introduction, the following methods may be followed.
-Use of Allis’ forceps to hold the anterior lip of cervix and straighten the endocervical canal
-Using an obturator or stylet or a firmer catheter.
25. Once the transfer is over, the patient is placed in a supine position for 20 to 30min. Then the patient can get up and be allowed to go home.
Important Points to be remembered after embryo transfer:
1. Rest for a week, not complete best rest
2. Avoid travelling long distances.
3. Avoid sexual intercourse(because of the uterine contractions).
4. Regular intake of medicines.
Optimising embryo transfer:
· Effort should be made to avoid difficult transfers
· Ultrasound guidance will result in easier transfers with improved outcomes
· Soft catheters should be used when feasible
· Trial transfers allow better preparation for difficult transfers
· Cervical mucus should be removed to potentially decrease bacterial contamination and mucus plugging of the catheter
· Embryos should be deposited in the mid-position of the uterus
· Negative pressure should be minimised during withdrawal of the catheter
· The procedure should be done in a minimum amount of time.
What is the success rate of a good embryo transfer?
Embryos can be transferred at the day 3 stage or blastocyst stage (Day 5 or Day 6).The success rate ranges from 80% to 30% depending on the age and the quality of embryos.
This is all about Embryo transfer.
Now a few words about SET(single embryo transfer)
Elective Single Embryo Transfer is a procedure in which one embryo selected from a number of available embryos is placed inside the uterus.
It may be the embryo frozen from a previous cycle or from the present fresh cycle which has yielded more than one embryo.
This is done to prevent complications of multiple pregnancy.
Now the world is moving towards single embryo transfer.


